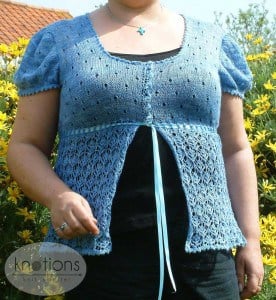
 This lightweight summer cardigan was inspired by those wonderful regency muslin dresses that you see in films such as Pride and Prejudice.
Working with empire lines and puffed sleeves can be a bit of a challenge, especially as everyone’s bust line is a little bit different. So it seemed by far the simplest thing to work from the top down using the method pioneered by Wendy Burnard in her Custom Knits book.
This means that you can try it on as you go to check that the end of the bodice section finishes in the correct place for your shape. If like me you are a little busty it is also possible to add a few short rows to the front of the bodice to stop it riding up.
Knitted from the top down with set in, afterthought sleeves, the main body of the cardigan is worked in a true lace pattern with patterning on every row.
Yarn provided by The Unique Sheep.
Sizes
Finished Bust Size 33 (36, 40, 44, 48)” to fit bust 32-34 (36-38, 40-42, 44-46, 48-50)”. Because the garment is knitted in laceweight yarn on larger needles it has a good amount of stretch.
Shown in size 44”
Yarn
The Unique Sheep Eos Laceweight (50% merino 50% silk; 1260 yards [1190m]/100 grams): Blue Jeans(MC), 1 ball; you will only need about half this amount so 800yds of any similar weight laceweight will be plenty.
Needles
US#6 (4 mm): 24” and 36” circular
Gauge
24 sts and 32 rows = 4” in eyelet lace pattern after light, wet blocking.
Notions
Removable markers in three different colors or designs; stitch holders; waste yarn for provisional cast on; tapestry needle; 9 (9, 11, 11, 13) small pearl buttons
Pattern Notes
This pattern is worked from the top down.
After completing the front and back to the armholes the rest of the body is knitted in one piece.
The sleeves are worked by picking up stitches around the armholes and working short rows to complete the cap before continuing in the round to finish them.
English Lace Chart

English Body Chart


Back
Using waste yarn, US#6 (4mm) needles and a provisional cast on, CO 84 (84, 96, 96, 102) sts.
Change to the main yarn and work in the eyelet lace pattern until back measures 6, (6.5, 7.25, 6.75. 6.5)” Note: The larger sizes have a shorter length to account for a deeper armhole.
Shape armholes: increase 1 st at both ends of next 3 (3, 3, 4, 4) RS rows.
CO 4 st at the beg of the next two rows for all sizes
CO 5 st at the beg of the next 2 (2, 2, 4, 6) rows; 108 (108, 120, 132, 148) sts.
Fronts
Please note that the neck shaping and the armhole shaping may take place at the same time
Return to the provisional CO and unzip the sts as follows:
Place 30 (30, 30, 30, 33) sts on a US#6 (4 mm) needle for the right front, 24 (24, 36, 36, 36) sts on to a stitch holder for the neck and 30 (30, 30, 30, 33) sts on a second stitch holder for the left front.
Work right front in eyelet lace pattern until front measures 6 (6.5, 7.25, 6.75. 6.5)”
Shape armholes: increase 1 st at armhole edge of next 3 (3, 3, 4, 4) RS rows.
CO 4 st at beg of the next RS row for all sizes
CO 5 st at beg of the next 1 (1, 1, 2, 3) RS rows
At the same time
When the front measures 6 (6.5, 7.25, 7.25, 7.5)” begin neck shaping as follows:
All sizes: Increase 1 st at neck edge of the work on every RS row, twice.
CO 5 (5, 8, 8, 8) sts at the neck edge of the next 2 RS rows.
Finish with a WS row.
Once all shaping has been completed you will have 54 (54, 60, 66, 74) sts.
Place these sts onto a stitch holder. Place the sts for the left front onto a US#6 (4mm) needle.
Complete the left front in same manner remembering to make the increases at the neck edge on the WS rows to mirror the R front. Finish with a WS row
Join body
Because of the stitch counts, the eyelet pattern will not be able to be worked across the whole of the sts without disrupting the already set patterns on the fronts and the back. For this reason place a removable stitch marker at each underarm join and work the eyelet pattern as set on the fronts and the back as if they were still separate parts of the garment.
If you are going to add short row shaping to the fronts this is the time to do it. Take note the number of additional rows you are adding because you will need to factor them into the buttonhole bands.
With RS facing, work across left front sts (starting with the center front), PM, work back sts, PM, work right front sts (starting from the armhole edge). Working the eyelet pattern as set work in pattern until work measures 2.5 (2.5, 3, 3, 3.5)” from join, ending with a RS row. Remove side seam markers.
Next Row (WS): Knit, increasing 9 (9, 2, 12, 14) sts evenly across the work.
Next Row: *K2tog, yo, rep from * to end of row.
Next Row: K.
Lower lace portion
K2, pm, work in English lace pattern across the work until last 2 sts, pm, k2.
Please note that the lace pattern contains patterning on RS and WS rows.
Work lower portion of the cardigan without shaping keeping the two sts at each end in garter st until work measures approx 12 ( 12, 13, 13, 13)” or preferred length ending with a row 1 or 7 of the chart.
Picot Edge: Work 3 rows stockinette. Next Row (WS): *K2tog, yo, rep from * to end of row. Work 3 rows stockinette.
Place all sts on waste yarn. You can bind off the sts if you prefer, but you will need to do so VERY loosely or you will not be able to block the cardigan edge correctly.
Sleeves
Starting at the center of the base of the armhole, using a US#6 (4mm) 24” circular pick up 12 (12, 12, 18, 21) sts, pm ( 1st color), pick up 24 (26, 29, 29, 30) sts pm (2nd color), pick up 48 (52, 58, 58, 60) sts, p ( 2nd color) , pick up 24 ( 26, 29, 29, 30)sts, pm (1st color), pick up 12 ( 12, 12, 18, 21) sts, pm (3rd color – to mark beg of rnd).
Knit to the first 2nd color marker, knit into the back and front of all sts between the two 2nd color markers (to create puffed sleeve), slip marker, w&t, purl across sts until you reach the first 2nd color marker. Slip marker, w&t. Start Eyelet lace chart. Continue to work back and forth across the sts working one more st at the end of each row, picking up wraps as you come to them, and wrapping and turning as you go until you have incorporated all sts up to the 1st color markers. You have now completed the sleeve cap.
From here you will begin to knit in the round. Remove all markers except for the beg of rnd marker at the base of the armhole and continue in patt until work measures 1 (1, 1.5, 1.5, 1,5)” from armhole edge at the base of the sleeve.
Work one rnd k2tog across all sts,
Picot Edge: Work 3 rnds stockinette.
Work one rnd k2tog, yo across all sts
Work 3 rnds stockinette. BO all sts.
Turn picot edge under and slip st into place.
Repeat for other sleeve
Finishing
Neckband
With RS facing and US#6 (4mm) circular needle, pick up 48 (51, 60, 60, 63) sts along right front, knit across the sts on the st holder from the back neck and pick up 48 (51, 60, 60, 63) sts down left front.
Work 3 rnds stockinette.
Work one rnd *k2tog, yo* across all sts.
Work 3 rnds stockinette.
BO all sts.
Turn picot edge under and slip st into place.
Bodice edge and buttonholes
Please note that if you added short row shaping to the fronts you will need to pick up extra sts for the button bands and adjust the numbers for the buttonholes.
Left Front
With RS facing, pick up 20 (20, 24, 24, 28) sts from the neck edge to the bottom edge of the Eyelet Lace portion of the bodice. Knit one row, BO all sts.
Right Front and Buttonholes
With RS facing, pick up 20 (20, 24, 24, 28) sts from the Eyelet Lace portion of the bodice to the neck edge, knit one row.
Next Row: K1, *k2tog yo, rep from * until 1 st rem, k1.
Next Row: K.
BO all sts.
Blocking
Block the cardigan using your preferred method. Block out the bottom lace portion to the dimensions given in the schematic.
Slip st the bottom picot edge into place stitch by stitch off the waste yarn.
Thread the ribbon through the eyelet row and trim to size. Sew on the buttons to correspond to the buttonholes.
Schematic

 About the Designer: Janine Le Cras
 About the Designer: Janine Le Cras
Janine Le Cras lives, works, and windsurfs on the small island of Guernsey in the middle of the English Channel. When she is not knitting, spinning or designing she can usually be found on her favorite beach sailing over the waves.
She can also be found at her blog and on Ravelry under the user name Guernseygal.
Pattern and images © 2009 Janine Le Cras.


Leave a Reply